

Convert Horizontal Video to Vertical for Socials: A Guide
You recorded amazing footage at your event. Hours of content captured every highlight, every reaction, every unforgettable moment. But those horizontal videos sit unused because social platforms now prioritise vertical formats. Your audience scrolls past content that doesn't fill their mobile screens. The engagement you expected never materializes.
You don't need to reshoot everything from scratch. You can convert horizontal video to vertical using AI powered tools and proven manual techniques. These methods reshape your existing footage for TikTok, Instagram Reels, and YouTube Shorts without sacrificing the quality or emotional impact you worked hard to capture.
This guide shows you four practical approaches to transform your horizontal content. You'll discover automated AI reframing that does the heavy lifting, manual cropping strategies for precision control, background blur techniques for wide shots, and smart framing methods that maintain visual focus. Each approach helps you repurpose existing footage for maximum reach across every major social platform.
Why vertical video commands more attention
Your horizontal footage reaches fewer people because social platforms now prioritise vertical content in their algorithms. Mobile users spend 94% of their time holding their phones in portrait orientation. When you convert horizontal video to vertical, you align with how people naturally consume content on their devices. This format shift isn't a passing trend; it represents a fundamental change in how audiences engage with video across every major platform.
Platform algorithms favour native vertical formats
Social media platforms reward content that keeps users engaged within their apps. Vertical videos occupy the entire mobile screen, which reduces distractions and increases watch time. TikTok reports that vertical content receives three times more engagement than horizontal videos. Instagram's algorithm similarly boosts Reels that fill the full screen, pushing them to more users through the Explore page and recommendation feeds.
Vertical videos capture attention faster because they eliminate the need for users to rotate their devices or squint at letterboxed content.
YouTube Shorts prioritizes vertical uploads in its feed algorithm. Your horizontal content appears smaller, with black bars on the sides, which signals to users that the video wasn't optimised for mobile viewing. This visual mismatch causes viewers to scroll past your content within the first two seconds.
Full-screen viewing creates immersive experiences
Mobile screens display vertical videos at 9:16 aspect ratio, giving you the entire canvas to work with. Your subject fills the frame from top to bottom, creating a more intimate viewing experience. Horizontal videos force platforms to shrink your content to fit, often reducing it to just 30% of available screen space. This size difference directly impacts whether viewers stop scrolling or keep moving past your post.
Step 1. Choose the right framing technique
Your framing technique determines which parts of your horizontal footage remain visible when you convert horizontal video to vertical. This decision happens before any technical conversion work begins. You need to identify where the visual focus sits in each clip: does your subject stay centred, move across the frame, or occupy specific zones? The right framing approach preserves the most important elements while naturally fitting the 9:16 vertical format.
Centre-lock framing for static subjects
Use centre-lock framing when your main subject remains in the middle of the horizontal frame. This technique crops equal amounts from both left and right sides, keeping your subject perfectly centred in the new vertical frame. Interviews, product demonstrations, and speeches work best with this approach because the action stays in one predictable location.
Position your crop zone around the speaker's face and upper body for talking-head content. The vertical frame should capture from just above the head down to mid-torso level. This composition matches what viewers expect from native vertical content and maintains professional framing standards across all social platforms.
Follow-focus tracking for moving subjects
Your tracking approach needs to follow subjects as they move horizontally across the original frame. Event footage often includes people dancing, walking, or performing across a wide space. Set your vertical crop to move with the action, recentering the frame as your subject shifts position throughout the clip.
Tracking framing maintains visual continuity by keeping your primary subject centred as they move, preventing awkward cuts where half the action disappears off-screen.
Apply keyframe adjustments every two to three seconds when manual tracking is required. Your crop zone should anticipate movement direction rather than reacting after subjects already moved out of frame.
Step 2. Use AI for automated reframing
AI powered reframing tools analyse your horizontal footage frame by frame, identifying subjects and automatically adjusting the crop zone as action moves across the screen. These algorithms track faces, bodies, and motion patterns without requiring manual keyframe placement. You upload your horizontal video, select your vertical output format, and the software generates a tracked crop that follows your subject throughout the entire clip.
How AI tracking algorithms identify subjects
Computer vision systems detect human faces, upper bodies, and movement vectors within each frame of your footage. The algorithm assigns confidence scores to different elements, prioritising faces over background objects. When multiple people appear on screen, the system focuses on the subject with the highest confidence score or groups subjects together if they remain close enough to fit within the vertical frame boundaries.
Configure automated reframing settings
Set your output aspect ratio to 9:16 before processing begins. Most AI tools offer padding options that determine how much extra space appears around detected subjects. Configure these parameters to match your content type:
- Tight framing: 10-15% padding for close-up interview content
- Medium framing: 20-30% padding for presenters with hand gestures
- Wide framing: 35-45% padding for dance, sports, or full-body movement
AI reframing processes footage in minutes rather than hours, letting you convert horizontal video to vertical at scale without frame-by-frame manual adjustments.
Step 3. Crop footage manually for focus
Manual cropping gives you complete control over what remains visible when you convert horizontal video to vertical. This approach works best when AI tools miss your intended focus or when you need precise framing around specific subjects. You define the crop boundaries yourself, positioning the vertical frame exactly where you want it within your horizontal footage. This method requires more time than automated solutions, but delivers results that match your creative vision exactly.
Identify your subject's safe zone
Locate the central action in your horizontal frame before setting any crop parameters. Play through your footage and mark timestamps where subjects enter or exit the frame edges. Your vertical crop zone must accommodate the full range of movement while keeping the most important visual elements centred.
Draw a 9:16 guideline overlay on your editing timeline to visualise the final vertical boundaries. Position this overlay so your primary subject stays within the centre 80% of the vertical frame throughout the clip. This buffer zone prevents subjects from appearing too close to frame edges, which creates uncomfortable compositions on mobile screens.
Adjust crop boundaries frame by frame
Set keyframes at movement transitions where your subject shifts position significantly. Most editing software requires keyframes every time you reposition the crop zone. Space these keyframes two to three seconds apart for smooth, natural panning that follows your subject without jarring jumps.
Manual keyframing produces professional results because you control exactly when and how the crop zone moves, matching the rhythm and pacing of your original footage.
Step 4. Utilize background blur for wide shots
Background blur fills empty vertical space when your horizontal footage contains action spread across the entire width of the frame. This technique places a blurred version of your original video behind the sharp, vertically cropped centre section. The result resembles Instagram's "fit to screen" feature but maintains the vertical format without black bars. You keep your full horizontal composition visible while the central action remains sharp and focused for mobile viewers.

When to apply blur effects
Apply background blur when your subject moves across different zones of the horizontal frame too quickly for tracking to follow smoothly. Crowd shots, wide landscape pans, and multi-person scenes work particularly well with this approach. The blurred background provides visual context about the wider scene while keeping viewer attention locked on the sharp centre portion.
Use this technique for event footage where you captured the entire stage or venue but need to convert horizontal video to vertical for social platforms. The blur maintains scene atmosphere without cropping out important peripheral action that helps viewers understand the event's scale and energy.
Set blur parameters for optimal results
Configure your blur radius between 15 and 25 pixels depending on how much background detail you want visible. Lower values (15-18 pixels) keep some background elements recognizable, while higher values (22-25 pixels) create a softer, more abstract backdrop that won't distract from your sharp centre content.
Background blur transforms unusable wide shots into platform-ready vertical content by preserving context while directing focus exactly where you need it.
Set your centre crop to 70-80% of the vertical frame height to balance sharp and blurred zones effectively.
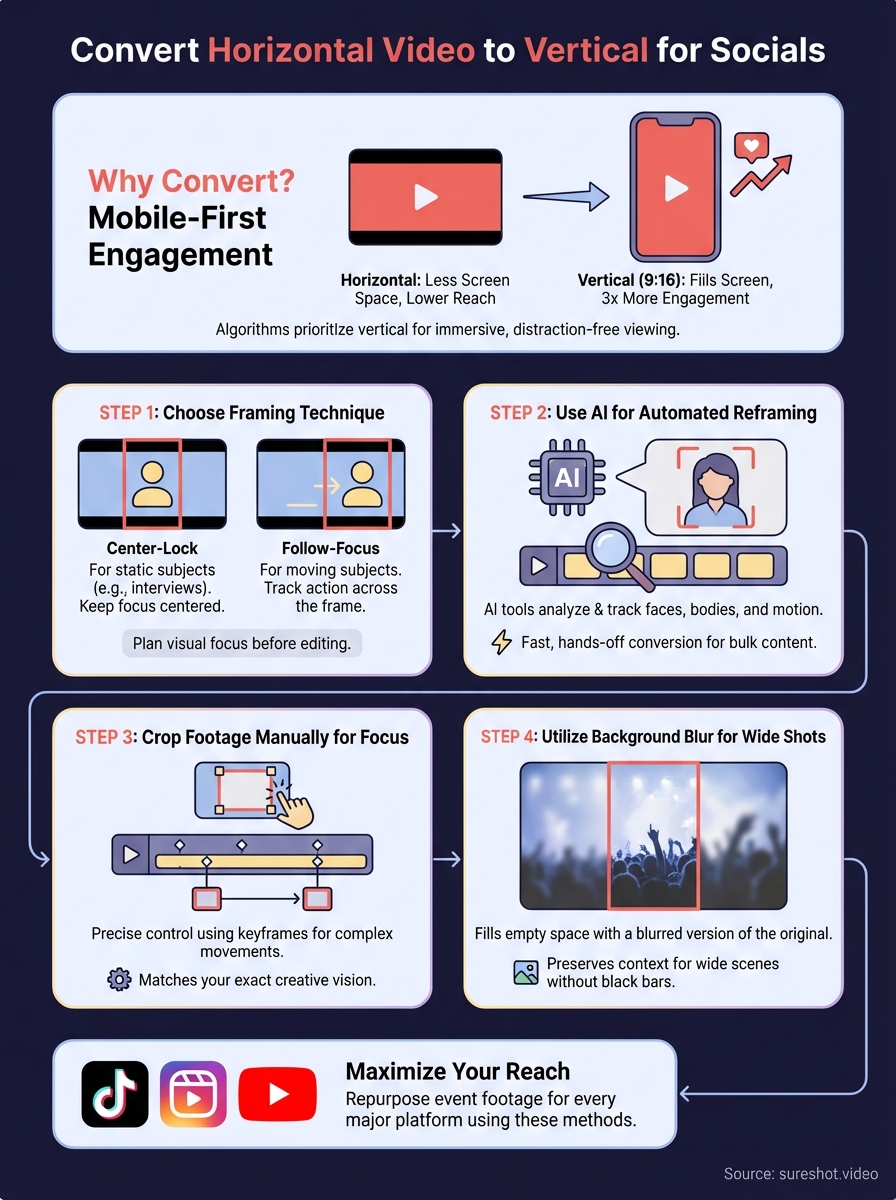
Maximise your event content reach
Your event footage gains maximum reach when you convert horizontal video to vertical for every major social platform. Each technique covered here transforms your existing content into mobile-optimised formats that audiences actually watch. AI reframing handles bulk conversion tasks in minutes, while manual cropping and background blur give you creative control over your most important clips.
Event organizers collect hours of horizontal footage but struggle to repurpose this content effectively across TikTok, Instagram Reels, and YouTube Shorts. You've learned the technical methods to reshape your videos, but the real opportunity lies in capturing authentic vertical content from the start. When your attendees record moments using their mobile devices, they naturally shoot in vertical format because that's how phones are held.
SureShot helps you collect this native vertical content directly from event attendees, giving you platform-ready videos without conversion work. Book a demo to see how attendee-generated content builds your social presence while reducing production costs.