
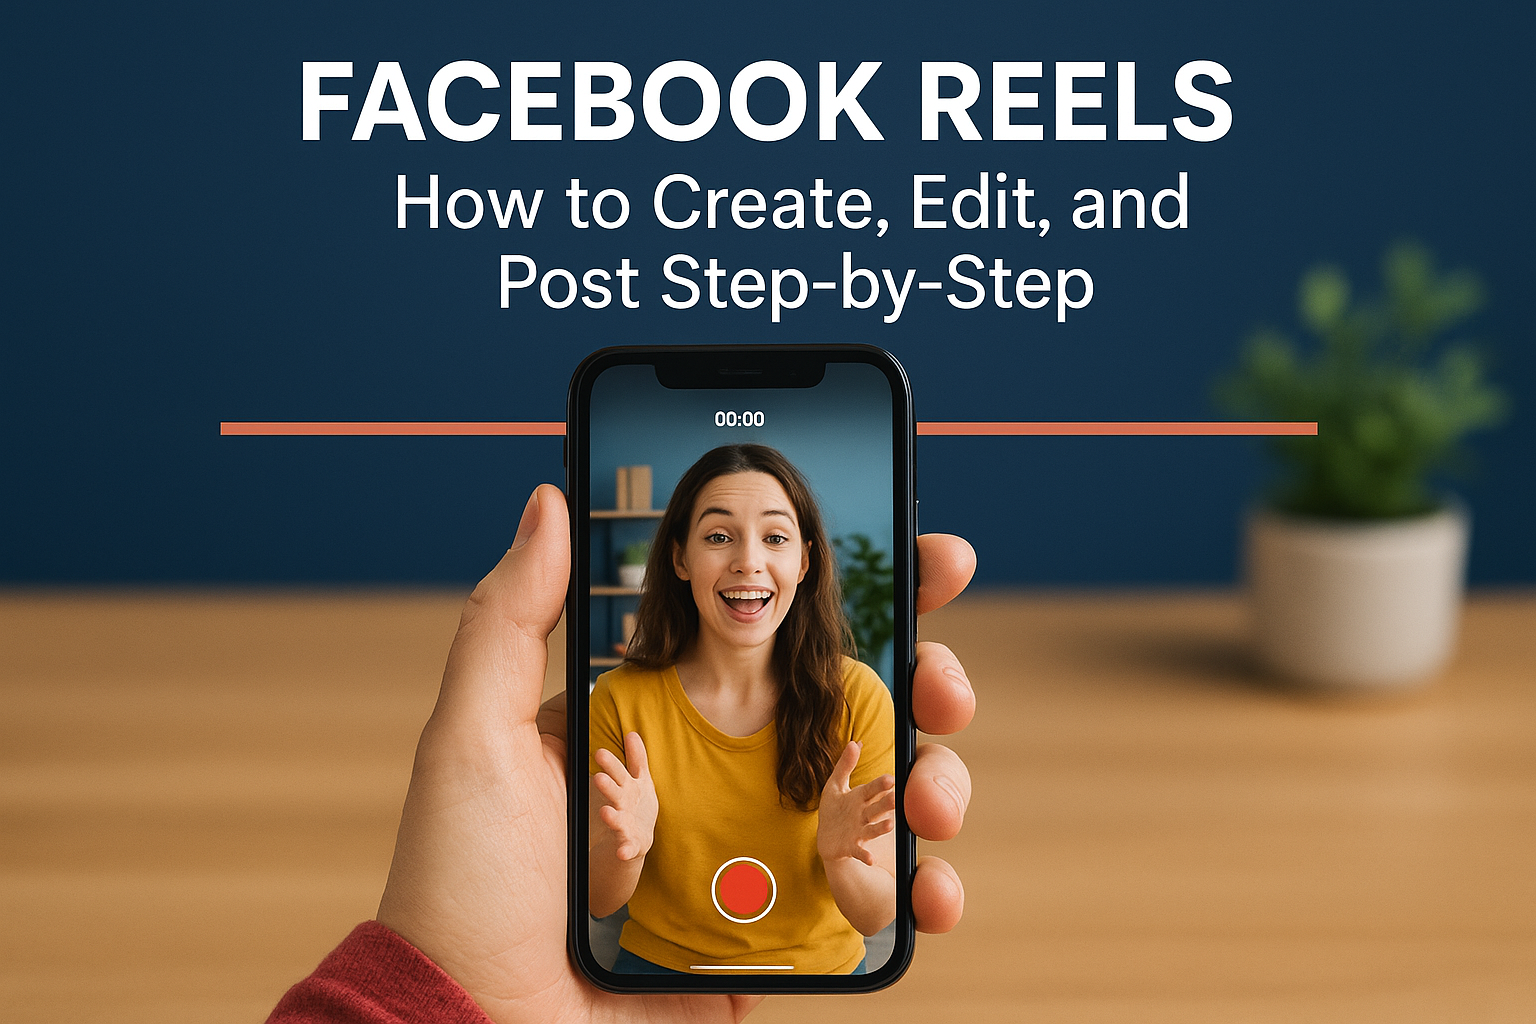

Facebook Reels: How to Create, Edit, and Post Step-by-Step
You see short videos everywhere on social media. They grab attention and get shared more than any other content type. But if you have never created a Facebook Reel before the interface can feel confusing. Where do you start recording? How do you add music? What tools actually matter? These questions keep you from capturing authentic moments that could promote your events or engage your audience.
Facebook Reels give you a simple way to create 90 second videos that reach people beyond your followers. The platform offers built in editing tools like music libraries, effects, and speed controls. You can record directly in the app or upload videos you already have. The best part is that Reels often get more organic reach than regular posts because Facebook pushes them to new audiences.
This guide walks you through every step of creating your first Facebook Reel. You will learn how to set up your account, record or upload footage, edit with creative tools, optimise your captions and settings, and use Reels to showcase events. By the end you will know exactly how to post professional looking Reels without expensive equipment or technical skills.
What Facebook Reels are and how they work
Facebook Reels are short vertical videos that play up to 90 seconds long. The platform designed this feature to compete with TikTok and Instagram Reels by giving creators a way to share quick engaging content with built in editing tools. You can add music from a licensed library, apply effects, adjust video speed, and use text overlays without leaving the app. The format appears in multiple places on Facebook including the main feed, Reels tab, and Facebook Watch.
Key features and technical specifications
Understanding facebook reels how to use the technical limits helps you plan better content. Each Reel accepts vertical video in 9:16 aspect ratio with a resolution of 1080x1920 pixels or higher. You get access to thousands of audio tracks in the music library plus the option to use original audio from your recording. The editing tools include speed controls (from 0.3x to 3x), a timer for hands-free recording, green screen effects, and AR filters that change in real time.
Facebook supports both MP4 and MOV video formats with H.264 compression for best quality.
How Facebook distributes your Reels
Facebook pushes Reels to people beyond your follower base through its recommendation algorithm. The system looks at engagement signals like watch time, shares, comments, and whether viewers watch your Reel all the way through. Videos that keep attention tend to reach more people organically. Your Reels can appear on anyone's feed regardless of whether they follow you, which gives you significantly more reach than standard posts. The algorithm also considers factors like when you post, which hashtags you use in captions, and how relevant your content is to specific audiences.
Step 1. Get your Facebook account ready
Your Facebook account needs proper setup before you can create Reels. The platform makes Reels available to both personal profiles and business pages, but each option gives you different features and reach potential. You also need to verify that your account has the Reels feature enabled, since some regions or account types might not see it immediately. Taking five minutes to configure these settings now prevents frustration when you try to post your first video.
Choose between personal profile and business page
Personal profiles let you share Reels with friends and public audiences depending on your privacy settings. You get access to all creative tools and can cross-post from Instagram if your accounts are linked. Business pages work better if you run an event organization or brand because they offer analytics, advertising options, and professional credibility. The main trade-off is that business pages cannot see certain personal features like dating or marketplace listings.
Most event organizers benefit from using a business page since it separates personal content from professional promotion.
Pick a business page when you need to track engagement metrics, run ads, or have multiple team members manage the account. Use your personal profile if you want to build an authentic creator presence where followers connect with you as an individual rather than a brand.
Enable Reels access in your settings
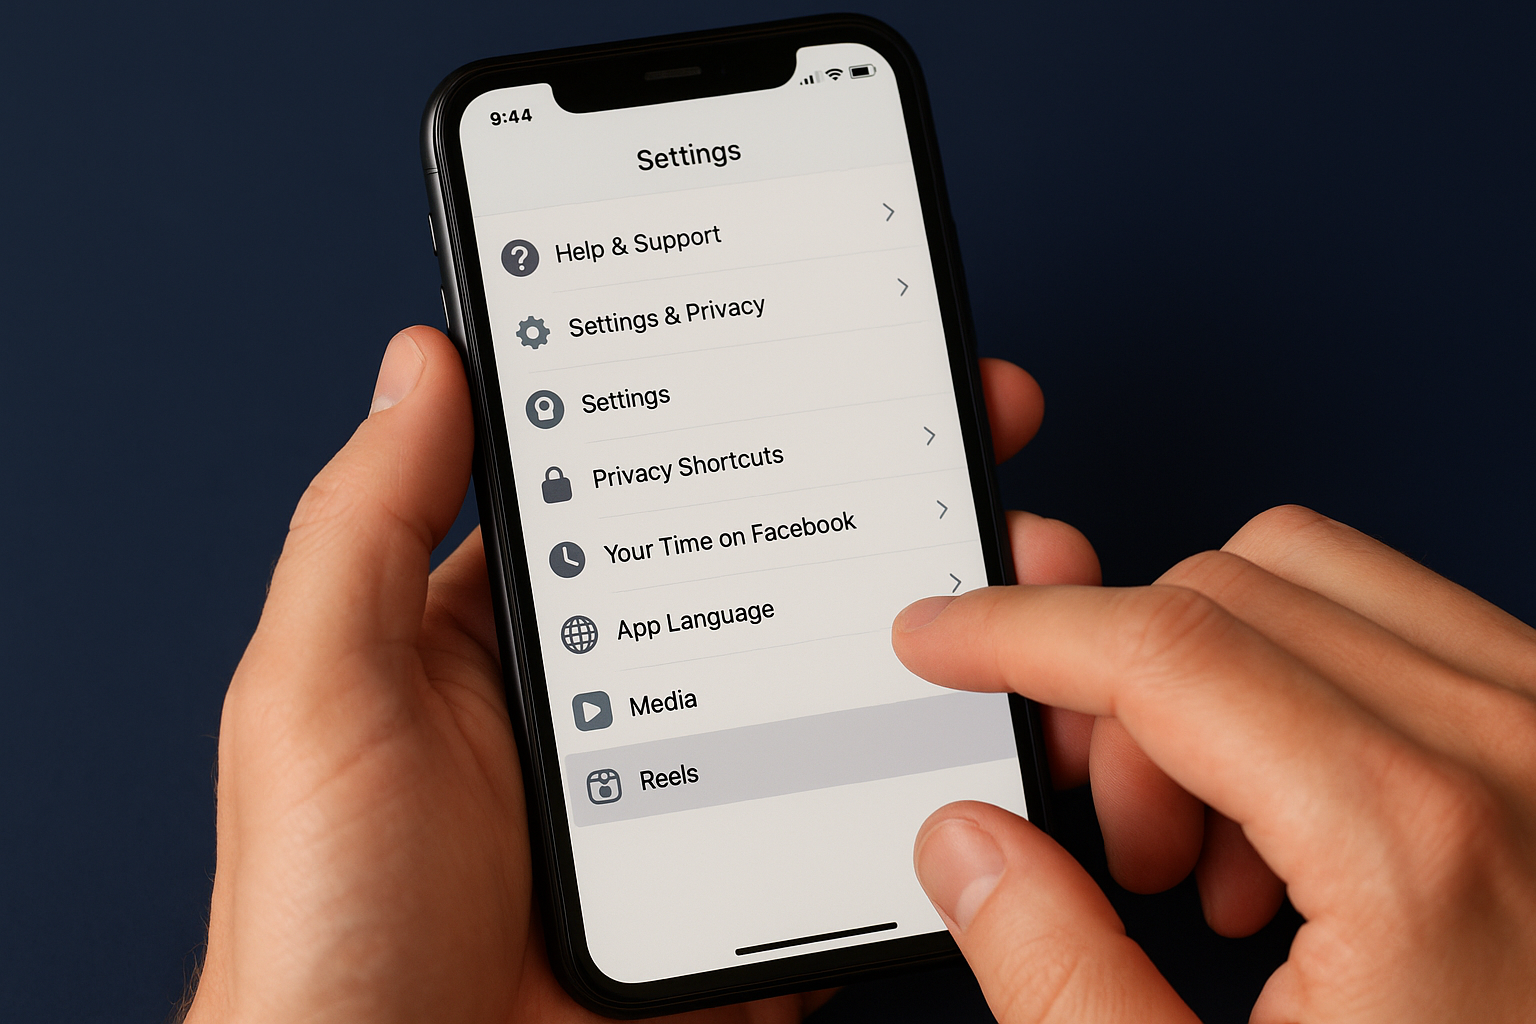
Open the Facebook mobile app and tap the three horizontal lines in the bottom right corner on iOS or top right on Android. Navigate to Settings and Privacy, then tap Settings. Scroll down to find Media or Media Settings depending on your app version. Look for an option labelled Reels or Short Videos and make sure it shows as enabled. If you do not see this option, your account likely already has Reels enabled by default in your region.
Step 2. Record or upload a Reel
You have two ways to create facebook reels how to content: record fresh footage inside the app or upload videos you already filmed. Both methods take you to the same editing tools after you capture or select your content. Recording directly works best when you want to use live effects like green screen or AR filters during filming. Uploading pre-recorded videos gives you more control over lighting and composition since you can shoot multiple takes with professional equipment before bringing footage into Facebook.
Record a new Reel directly in the app
Tap the plus icon at the top of your Facebook app and select Reel from the menu. The camera interface opens in vertical mode ready to record. Press and hold the red record button to capture video in segments up to the 90 second limit. You can release the button to stop recording, reposition yourself or your subject, then press again to continue where you left off. This segment recording approach lets you create jump cuts and transitions without needing separate editing software.
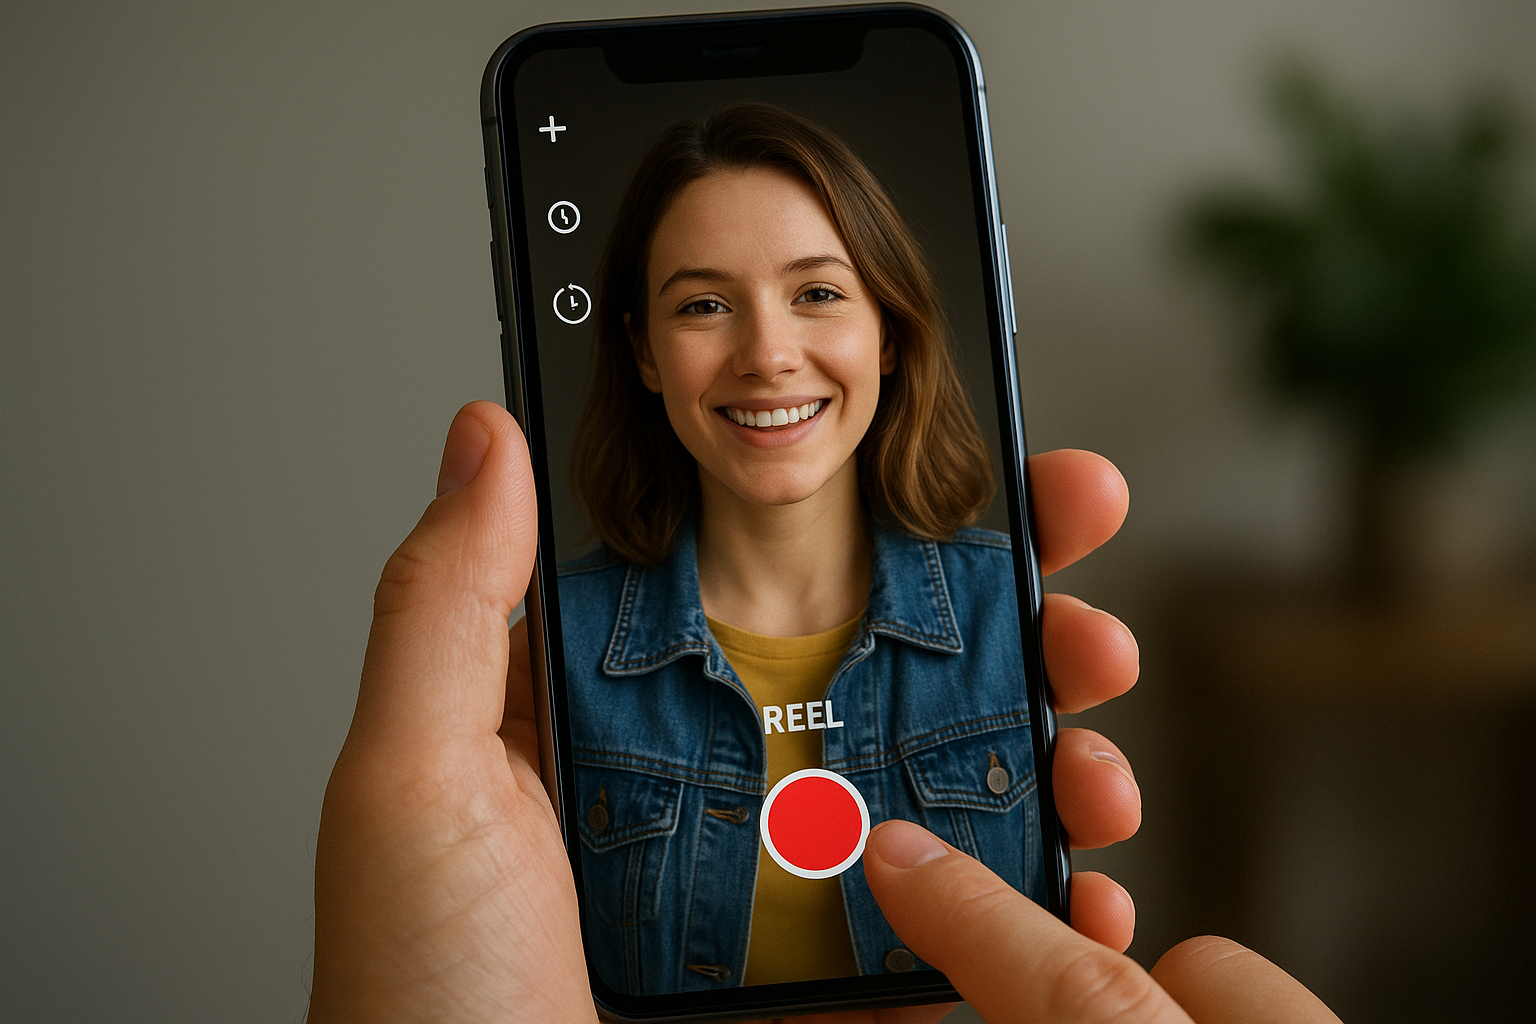
Before you start filming, look at the icons on the left side of your screen. The timer icon gives you a countdown so you can position yourself hands-free before recording begins. Set it to 3 or 10 seconds depending on how much setup time you need. The speed control lets you slow down or speed up your recording in real time, which creates effects like smooth motion or time lapse without post-production work.
Recording in segments helps you fix mistakes immediately instead of starting over from the beginning.
Upload pre-recorded videos from your device
Tap the plus icon and select Reel just like the recording method. Instead of pressing the record button, tap the gallery icon in the bottom left corner of the camera screen. Your phone's camera roll appears with all available photos and videos. Select up to 10 clips that you want to combine into one Reel. Facebook automatically stitches them together in the order you select them.
You can trim each uploaded clip before adding it to your Reel. Drag the yellow handles on the timeline to cut out unwanted sections at the beginning or end of any video. Choose clips that total no more than 90 seconds combined length. This upload method works perfectly when you captured event footage on a proper camera or filmed content earlier that you want to repurpose into a Reel format.
Step 3. Edit your Reel with tools
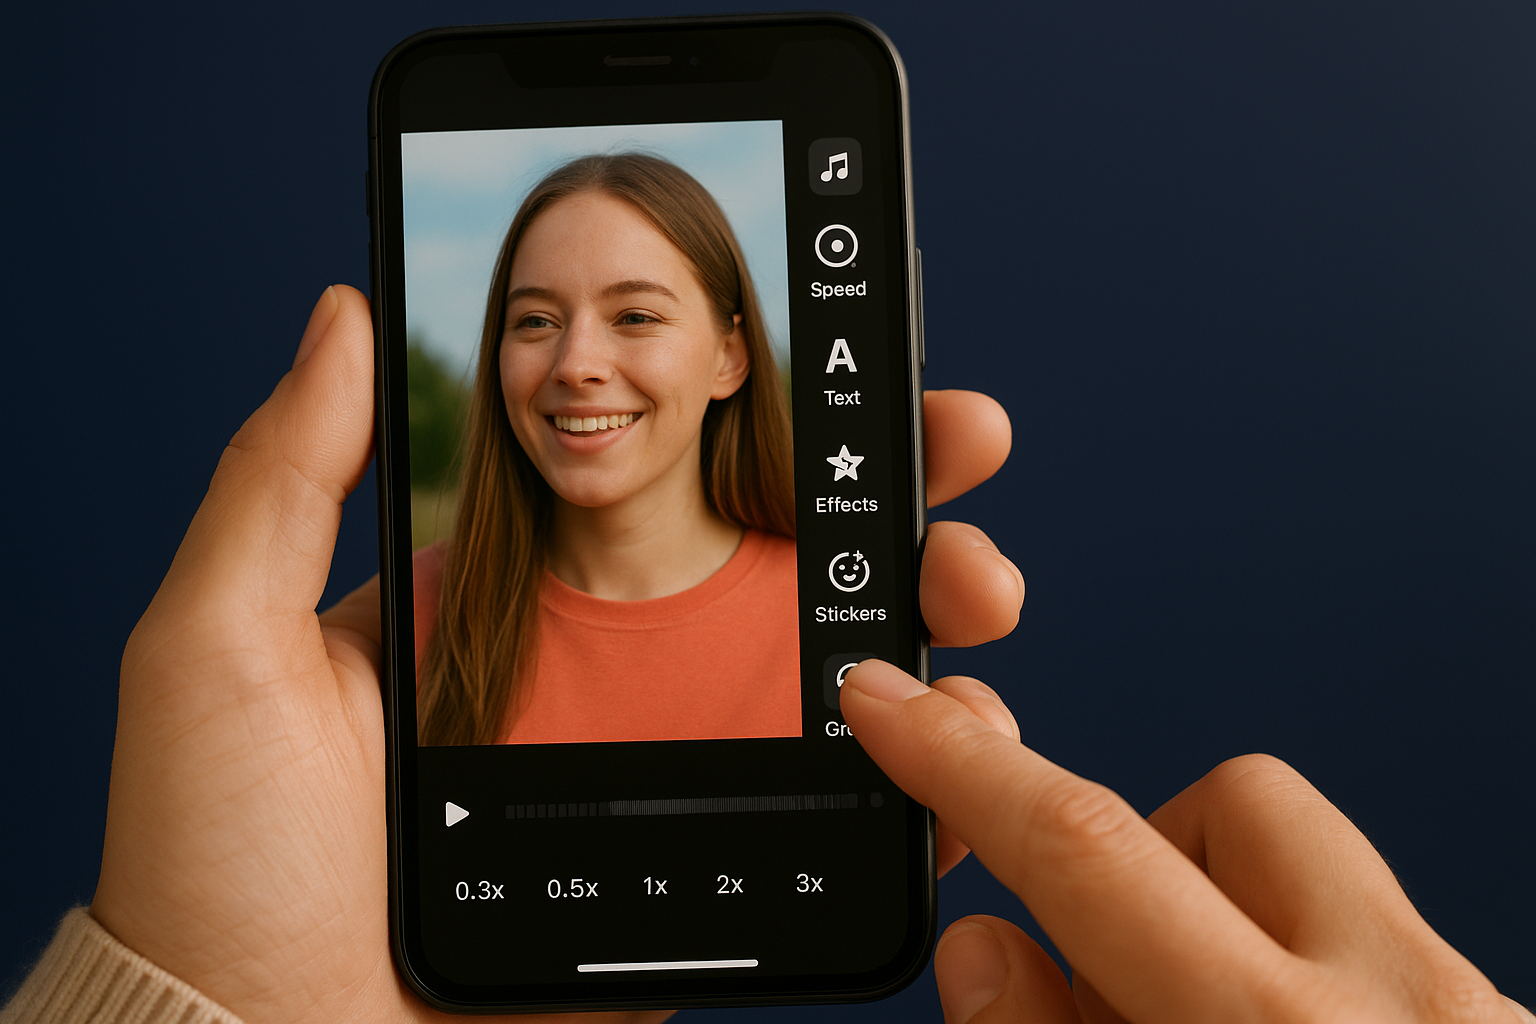
The editing screen appears as soon as you finish recording or uploading your video. Facebook provides eight main editing tools displayed as icons along the right side of your screen. These tools let you customise your Reel without needing external editing software. You can add music, change video speed, apply filters, insert text, and use green screen effects all from this interface. Each tool opens a submenu with specific options that transform your raw footage into polished content.
Add music and audio to your video
Tap the Audio icon at the top of the editing toolbar to access Facebook's music library. Browse through thousands of licensed tracks organised by genre, mood, and trending sounds. Search for specific songs using the search bar at the top of the screen. When you find a track you like, tap it to preview how it sounds with your video. You can adjust where the song starts by dragging the audio waveform left or right to match your video's pacing.
The volume mixer lets you balance your original video audio with the music track. Lower your original audio to 0% if you want only the music to play, or keep it at 100% to use your recorded sound without background music. Most creators find that 30% original audio and 70% music creates the best mix for talking videos with background music.
Apply effects and adjust video speed
Speed controls appear in the left toolbar during recording or in the editing menu after you upload footage. Tap the Speed icon to select from five preset options: 0.3x, 0.5x, 1x, 2x, or 3x. Slow motion at 0.3x or 0.5x works perfectly for highlighting action sequences or emotional moments at events. Fast speed at 2x or 3x turns long processes into quick time lapses that keep viewers engaged.
Changing speed affects how long your video plays, so a 60 second clip at 2x speed becomes 30 seconds in your final Reel.
Effects and filters change your video's visual appearance with one tap. Open the Effects menu to browse AR filters, colour adjustments, and visual effects. Green screen effects let you replace your background with any image or video from your camera roll. Tap the green screen icon, select your background media, then film or upload your foreground subject. Facebook automatically removes your original background and composites the layers together.
Use text overlays and stickers
Text overlays help facebook reels how to communicate your message when viewers watch without sound. Tap the Text icon to open the keyboard and type your message. Choose from multiple font styles and colours to match your brand or event theme. You can position text anywhere on screen by dragging it with your finger. Tap the text again to set when it appears and disappears by adjusting the timeline markers at the bottom of your screen.
Stickers add interactive elements like location tags, polls, and animated graphics. The Sticker menu includes GIFs, emoji reactions, and special event stickers that update automatically. Location stickers help local audiences find your events while timestamp stickers show when footage was captured. Pin stickers to moving objects in your video so they track motion automatically throughout the clip.
Step 4. Add captions, tags, and settings
Your Reel needs proper captions and settings to reach the right audience after you finish editing. This step determines who sees your content and how viewers discover it through search and recommendations. Facebook gives you control over privacy settings, audience targeting, and metadata that affects distribution. Spending extra time on these settings increases your chances of reaching people interested in your events or content.
Write captions that drive engagement
Captions provide context and encourage viewers to interact with your Reel. Write your main message in the first two lines since Facebook truncates longer captions behind a "see more" button. Include a clear call to action like asking viewers to comment, share their experience, or visit your event page. Tap the text field at the top of the sharing screen to open the keyboard and type your caption.
Your caption should explain what viewers just watched and why it matters to them. Event organizers can mention upcoming dates, ticket information, or behind the scenes details that build anticipation. Keep sentences short and direct to maintain readability on mobile screens. Add relevant hashtags at the end of your caption to help new audiences discover your content through search, but limit yourself to 3 to 5 hashtags that directly relate to your video topic.
Well written captions can increase watch time by giving viewers a reason to stick around for the full 90 seconds.
Tag people and locations
Tagging expands your reach by notifying tagged accounts and showing your Reel to their followers. Tap Tag People below the caption field to search for Facebook profiles or pages that appear in your video or contributed to the content. You can tag performers, sponsors, venues, or attendees who gave you permission to feature them. Each tagged person receives a notification and your Reel appears on their profile under tagged content.
Location tags help local audiences find your facebook reels how to content when they browse specific areas. Tap Add Location and search for the venue, city, or landmark where you filmed. This feature works particularly well for event organizers promoting festivals, conferences, or recurring gatherings at recognizable locations. Location tags also appear as clickable links that show all recent Reels from the same place.
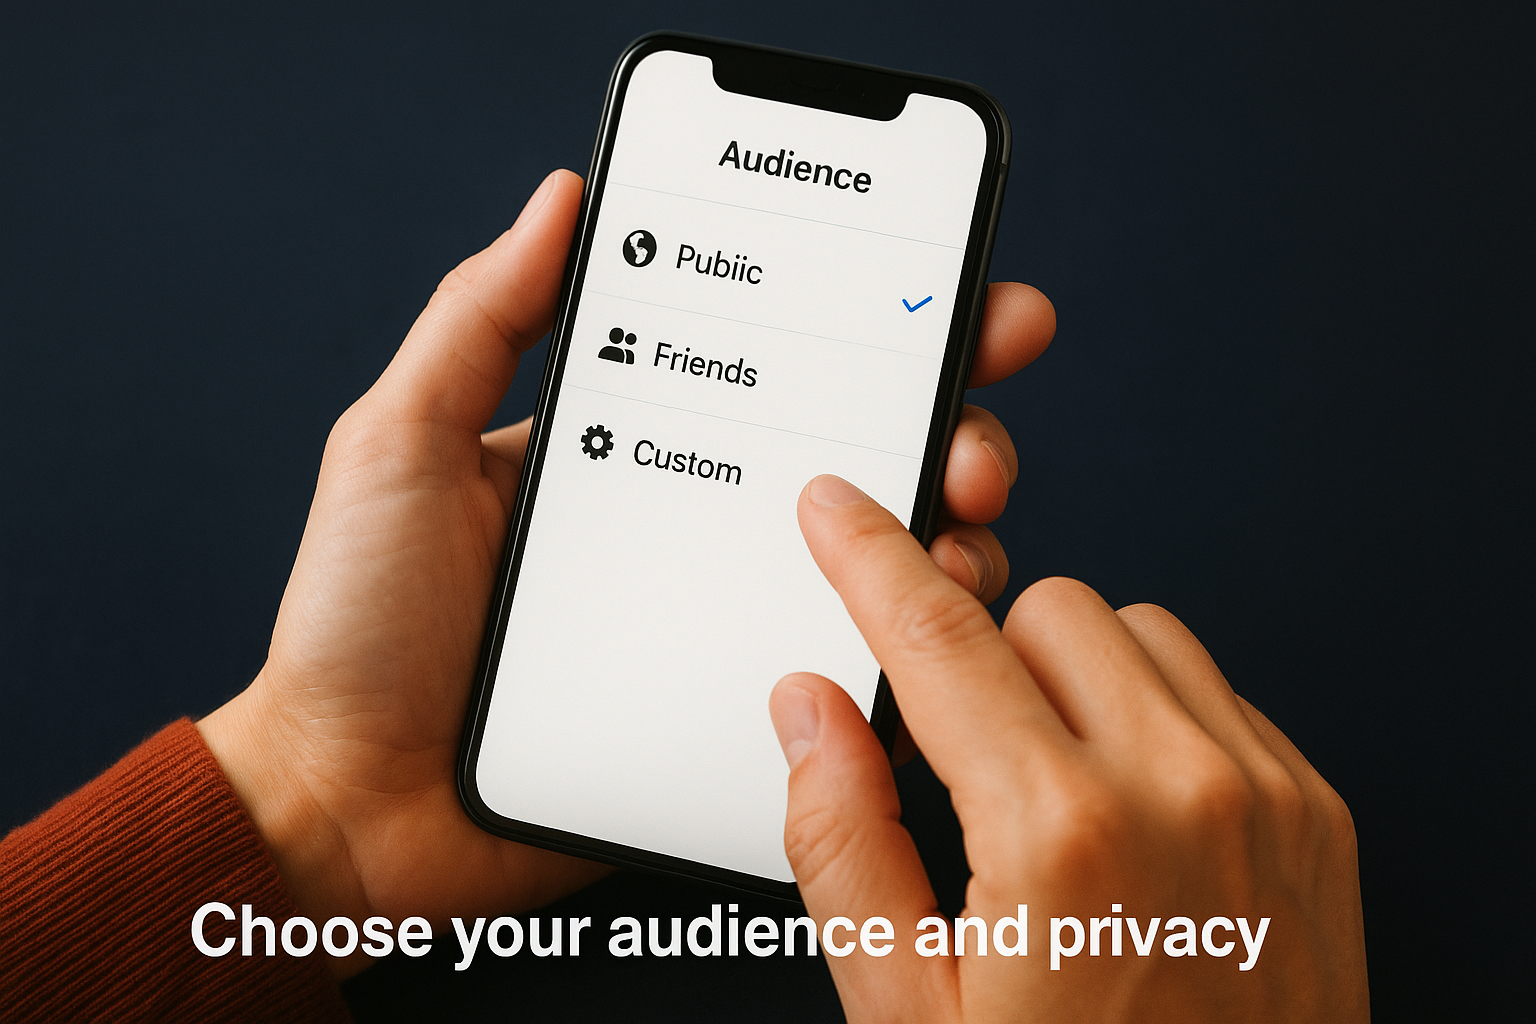
Choose your audience and privacy settings
Privacy controls determine who can view and interact with your Reel after you publish it. Tap the audience selector that defaults to Public to see your options. Select Public if you want maximum reach beyond your followers and friends. Choose Friends to limit visibility to people you already connected with on Facebook. The Custom option lets you exclude specific people or lists from seeing your content.
Business pages only offer Public and Custom settings since they exist to reach broad audiences. You can also save your Reel as a draft instead of publishing immediately by tapping Save as Draft at the bottom of the screen. Drafts store in your profile so you can schedule posts for later or make additional edits before going live. Review all settings one final time before you tap the blue Share button to publish your Reel.
Step 5. Use Reels to showcase events and grow reach
Event organizers gain massive promotional value when they use facebook reels how to capture authentic moments that traditional marketing cannot replicate. Your Reels can showcase live performances, attendee reactions, and behind-the-scenes preparation that builds anticipation for future events. The vertical video format works perfectly for mobile viewers who scroll through social feeds during their commute or breaks. You create content that feels personal rather than polished, which increases trust and engagement from your target audience.
Show behind-the-scenes event preparation
Behind-the-scenes footage gives potential attendees a preview of your event atmosphere and production quality. Film your team setting up stages, testing sound equipment, arranging vendor booths, or rehearsing with performers. These clips demonstrate the effort and professionalism behind your events while creating excitement for what attendees will experience. Record short segments throughout your setup day and combine them into a single 60-to-90-second Reel that shows the transformation from empty venue to ready-for-guests space.
Your behind-the-scenes Reels should include text overlays that explain what viewers see. Add captions like "6 hours until doors open" or "Meet our sound engineer" to provide context. These videos perform well when posted 24 to 48 hours before your event because they capitalize on last-minute ticket purchase decisions and build anticipation among confirmed attendees.
Capture attendee moments and reactions
Recording attendee experiences during your event creates authentic social proof that promotional materials cannot match. Walk through crowds and film people dancing, laughing, or enjoying performances for 3-to-5-second clips you combine later. Ask attendees to share their favourite moment on camera for testimonial-style content that future ticket buyers trust more than advertising. You can also film crowd reactions during surprise announcements or special moments that showcase the energy at your events.
Authentic attendee footage often receives 3 to 5 times more engagement than professionally produced event promos.
Request permission before featuring recognizable faces in your Reels to respect privacy and maintain trust. Post these attendee-focused Reels within 24 hours of your event while the experience remains fresh in people's minds and attendees actively share their own content.
Post at optimal times for maximum reach
Timing affects how many people see your Reels when Facebook's algorithm distributes content. Research shows that Tuesday through Thursday between 1 PM and 3 PM typically generates the highest engagement for event-related content in most regions. Your specific audience might behave differently based on their work schedules and time zones, so track which posting times produce the best results over multiple Reels.
Consistency matters more than perfection when building reach. Commit to posting 2 to 3 Reels per week during event promotion periods and at least one Reel within 24 hours after each event concludes. This regular schedule trains Facebook's algorithm to recognise your account as an active content creator worth promoting to new audiences.

Bring your Facebook Reels to life
You now know the complete facebook reels how to process from recording your first video to optimising settings for maximum reach. The platform gives you professional editing tools and distribution power without requiring expensive equipment or technical expertise. Start with simple behind-the-scenes clips from your events and build confidence as you experiment with effects, music, and timing strategies that connect with your audience. Each Reel you publish teaches you what resonates with viewers.
Event organizers who master Reels gain authentic promotional content that drives ticket sales and builds community loyalty between events. The format works because short vertical videos match how people naturally consume content on mobile devices. If you want to take your event video strategy further, book a demo with SureShot to discover how attendee-generated video content amplifies your reach beyond what you can film yourself. Your next Reel could showcase moments you never captured before.